目录
最近 AI 绘画十分火爆,我看得也有些心痒痒。于是在移动 SSD 里面装了一个 Deepin 20.7,顺便也能当个随身系统了。
先前我已经进行了多次试验,证明 AMD 显卡采用 DirectML 无法在 Windows 下运行泄露模型,因为没有合理的方式转换为 ONNX 格式模型。而且,DirectML 运行 ONNX 的其他 Stable Diffusion 模型效率也偏低。
于是我只能选择在 Linux 下采用 ROCm 运行,也踩到了不少坑。
指导链接:Install-and-Run-on-AMD-GPUs
环境安装
基于 ROCm 的深度学习环境在 Linux 下环境配置相对复杂,我们分节描述。
ROCm 环境准备
Deepin 官方的软件源缺少部分软件包,所以需要加入 Ubuntu 的 security 源拉取部分内容。首先,从 Ubuntu 服务器和 AMD Radeon 拉取必备的 GPG 公钥。
gpg --keyserver keyserver.ubuntu.com --recv-keys 16126D3A3E5C1192
curl https://repo.radeon.com/rocm/rocm.gpg.key | sudo apt-key add -
gpg --armor --export | sudo apt-key add -
echo 'deb http://security.ubuntu.com/ubuntu bionic-security main universe' | sudo tee -a /etc/apt/sources.list
echo 'deb [arch=amd64] https://repo.radeon.com/rocm/apt/5.1.1 ubuntu main' | sudo tee /etc/apt/sources.list.d/rocm.list
sudo apt update
然后安装必备依赖项:
sudo apt install libnuma-dev libpython3.8 rocm-dev rocm-libs
安装成功后使用 rocm-smi 命令查看 GPU,若出现形如以下内容的 GPU 信息则安装成功,首次安装完成可能需要重启,然后即可在 /etc/apt/sources.list 去除 Ubuntu Security 源。
======================= ROCm System Management Interface =======================
================================= Concise Info =================================
GPU  Temp   AvgPwr  SCLK     MCLK    Fan  Perf  PwrCap  VRA
0    55.0c  18.0W   2735Mhz  541Mhz  0%   auto  130.0W   46%   3%
================================================================================
============================= End of ROCm SMI Log ==============================
然后配置以下动态库路径,编辑 /etc/ld.so.conf.d/10-rocm.conf:
/opt/rocm-5.1.1/lib
/opt/rocm-5.1.1/rocsolver/lib
/opt/rocm-5.1.1/rocblas/lib
/opt/rocm-5.1.1/rocclr/lib
此时 ROCm 的基本环境搭建完成。
部分参考:deepin20.6正确安装rocm,前面一直整不好,今天终于搞定了
Python 环境准备
这里主要是因为 Deepin 默认预装的是 Python 3.7,版本过老,Ubuntu 等发行版可忽略,该部分只是照顾 Linux 基础较差的读者。
下载 Python 3.10 的源码包,解压后进入该目录。
安装必备依赖和编译安装:
sudo apt install -y make build-essential libssl-dev zlib1g-dev liblzma-dev libbz2-dev libreadline-dev libsqlite3-dev llvm libncurses5-dev libncursesw5-dev xz-utils tk-dev
./configure --enable-optimizations --with-ssl
make "-j$(nproc)"
sudo make altinstall
Stable Diffusion WebUI 搭建
首先是基础的环境搭建:
git clone https://github.com/AUTOMATIC1111/stable-diffusion-webui
cd stable-diffusion-webui
python3.10 -m venv venv
source venv/bin/activate
python -m pip install --upgrade pip wheel
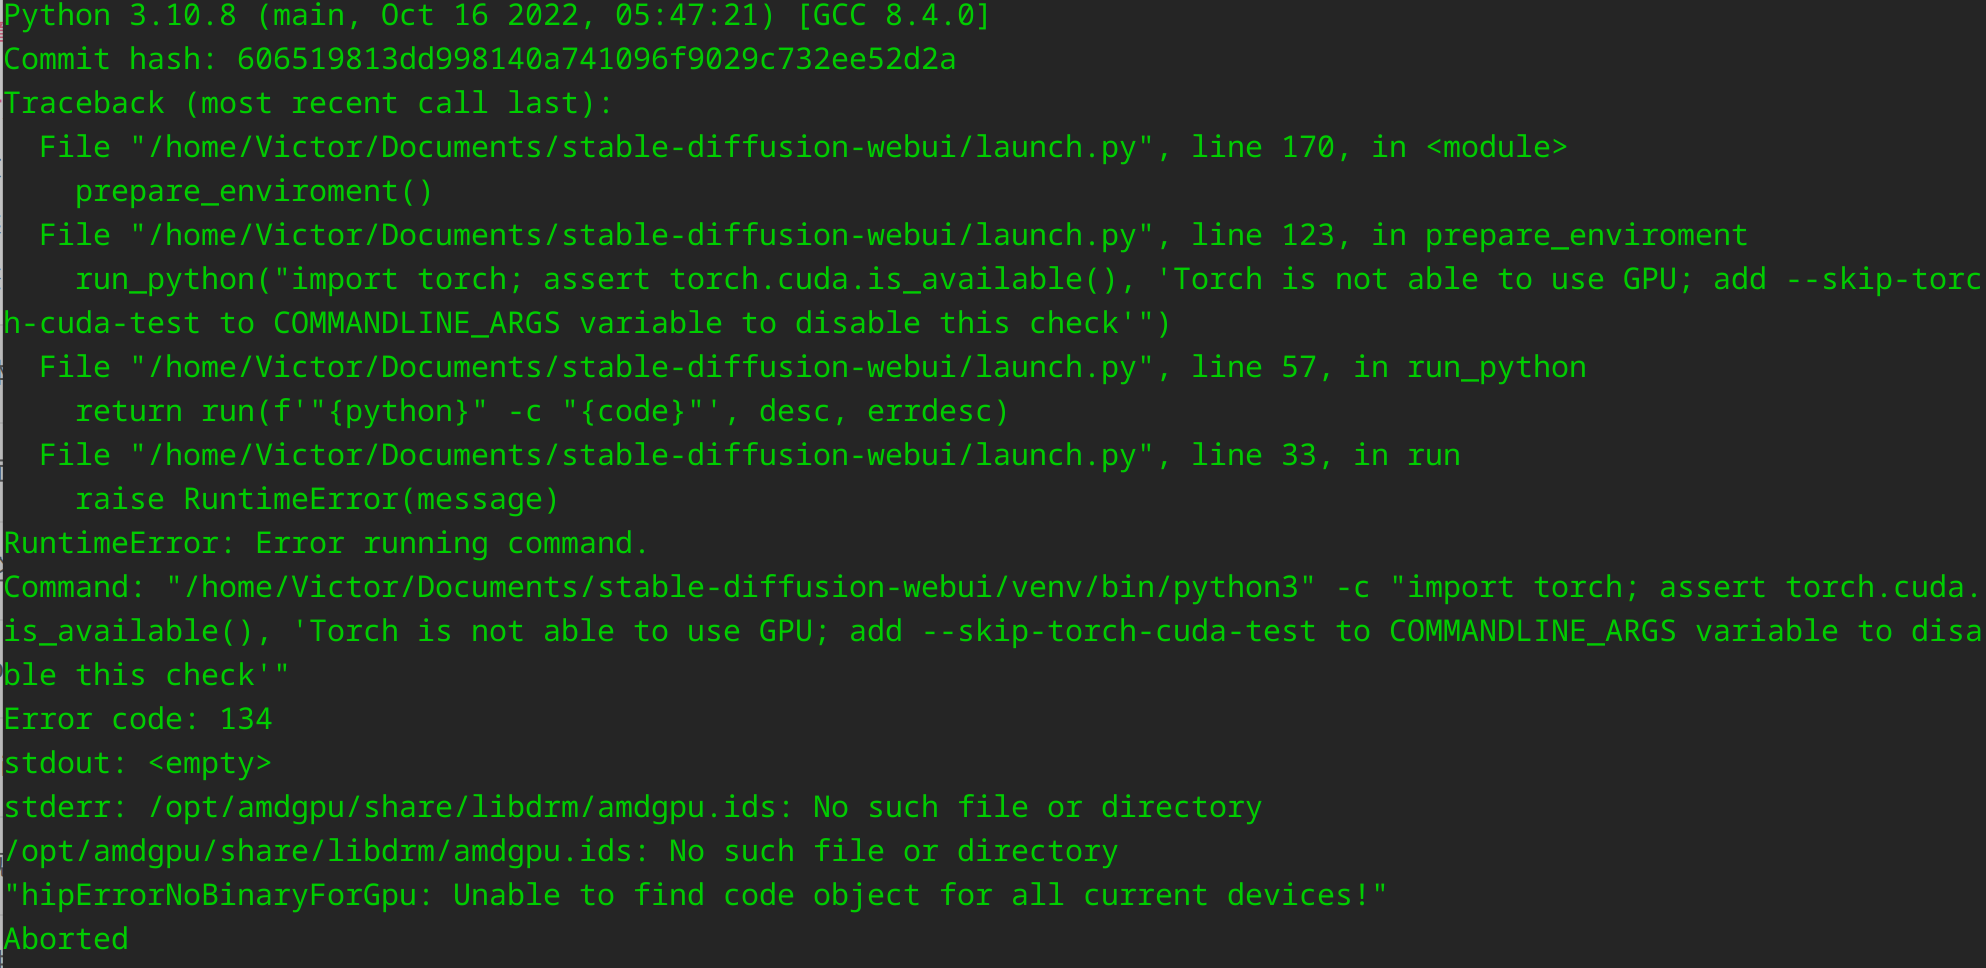
此时注意,若遵照 Wiki 直接运行后面的指令则会出现以下报错:

这是由于首先我们不是 CUDA 显卡,需要跳过 CUDA 测试,这个老生常谈。
但是 Aborted 呢?查阅资料后我了解到 AMD Radeon RX 6600XT 是没有被 ROCm 官方支持的显卡(代号为 gfx1032)。因此我们需要进行 HSA override,以 gfx1030 仿冒运行,最终启动命令如下:
HSA_OVERRIDE_GFX_VERSION=10.3.0 TORCH_COMMAND='pip install torch torchvision --extra-index-url https://download.pytorch.org/whl/rocm5.1.1' COMMANDLINE_ARGS='--skip-torch-cuda-test' python3 launch.py
这里对于 RX6600XT 不需要强制使用全精度。
如果一切良好,你应当能够在 http://127.0.0.1:7860 访问你的实例。
然后你就可以把你的模型放入 models/Stable-diffusion 下了。
性能问题解决
首先,AMD 启动后第一次生成时间会相对较长,这是正常现象。
但是,对于没有官方支持的显卡,电脑开机后第一次使用 ROCm 计算时,驱动会自动将显卡锁在低性能。可采用 rocm-smi 查看:

因此,我们需要执行一次以下指令解除锁定:
rocm-smi -d 0 --setperflevel auto
尾声
最后我写了一个脚本 run.sh:
#!/bin/bash
cd "$(dirname $0)"
source ./venv/bin/activate
export HSA_OVERRIDE_GFX_VERSION=10.3.0
export TORCH_COMMAND='pip install torch torchvision --extra-index-url https://download.pytorch.org/whl/rocm5.1.1'
export COMMANDLINE_ARGS='--skip-torch-cuda-test'
sudo bash -c '(sleep 60 ; rocm-smi -d 0 --setperflevel auto) &'
python3 launch.py "$@"
AMD 显卡采用 ROCm 计算的速度是不慢的,而且具备显存不足时调用内存的能力,即使显存不是很大的显卡也可以用于生成分辨率较高的图像,环境折腾虽然麻烦却也值得。
请教下,怎么确认是GPU在跑而不是CPU呢?
弄了一天了,cuda还是不可用裂开了
出现了一些错误:_init__.py:88: UserWarning: HIP initialization: Unexpected error from hipGetDeviceCount(). Did you run some cuda functions before calling NumHipDevices() that might have already set an error? Error 101: hipErrorInvalidDevice (Triggered internally at ../c10/hip/HIPFunctions.cpp:110.)
return torch._C._cuda_getDeviceCount() > 0
Warning: caught exception ‘Unexpected error from hipGetDeviceCount(). Did you run some cuda functions before calling NumHipDevices() that might have already set an error? Error 101: hipErrorInvalidDevice’, memory monitor disabled
LatentDiffusion: Running in eps-prediction mode
rocm的版本是5.2.0的,也安装了对应的torch和torchvision包,请问这是为什么检测不到gpu呢?
使用的命令是:HSA_OVERRIDE_GFX_VERSION=10.3.0 TORCH_COMMAND=’pip install torch torchvision –extra-index-url https://download.pytorch.org/whl/rocm5.2‘ COMMANDLINE_ARGS=’–skip-torch-cuda-test’ python3 launch.py –no-half
显卡是RX6600
大佬求助,我按照步骤做下来成功进入来ui界面,但在生成图片的时就会出错显示“RuntimeError: “LayerNormKernelImpl” not implemented for ‘Half’ ”。
下面时代码:
DENIRED@DENIRED-PC:~$ cd stable-diffusion-webui/
DENIRED@DENIRED-PC:~/stable-diffusion-webui$ source venv/bin/activate
(venv) DENIRED@DENIRED-PC:~/stable-diffusion-webui$ HSA_OVERRIDE_GFX_VERSION=10.3.0 TORCH_COMMAND=’pip install torch torchvision –extra-index-url https://download.pytorch.org/whl/rocm5.1.1‘ COMMANDLINE_ARGS=’–skip-torch-cuda-test’ python3 launch.py
Python 3.10.8 (main, Oct 23 2022, 16:59:54) [GCC 8.4.0]
Commit hash: 1ef32c8b8fa3e16a1e7b287eb19d4fc943d1f2a5
Installing requirements for Web UI
Launching Web UI with arguments:
/home/DENIRED/stable-diffusion-webui/venv/lib/python3.10/site-packages/torch/cuda/__init__.py:83: UserWarning: HIP initialization: Unexpected error from hipGetDeviceCount(). Did you run some cuda functions before calling NumHipDevices() that might have already set an error? Error 101: hipErrorInvalidDevice (Triggered internally at ../c10/hip/HIPFunctions.cpp:110.)
return torch._C._cuda_getDeviceCount() > 0
Warning: caught exception ‘Unexpected error from hipGetDeviceCount(). Did you run some cuda functions before calling NumHipDevices() that might have already set an error? Error 101: hipErrorInvalidDevice’, memory monitor disabled
LatentDiffusion: Running in eps-prediction mode
DiffusionWrapper has 859.52 M params.
making attention of type ‘vanilla’ with 512 in_channels
Working with z of shape (1, 4, 32, 32) = 4096 dimensions.
making attention of type ‘vanilla’ with 512 in_channels
Loading weights [4470c325] from /home/DENIRED/stable-diffusion-webui/models/Stable-diffusion/wd-v1-3-float32.ckpt
Global Step: 683410
Applying cross attention optimization (InvokeAI).
Model loaded.
Loaded a total of 0 textual inversion embeddings.
Embeddings:
Running on local URL: http://127.0.0.1:7860
To create a public link, set `share=True` in `launch()`.
Loading weights [81761151] from /home/DENIRED/stable-diffusion-webui/models/Stable-diffusion/v1-5-pruned-emaonly.ckpt
Global Step: 840000
Applying cross attention optimization (InvokeAI).
Weights loaded.
Error completing request
Arguments: (‘a lonely girl’, ”, ‘None’, ‘None’, 20, 0, False, False, 1, 1, 7, -1.0, -1.0, 0, 0, 0, False, 512, 512, False, 0.7, 0, 0, 0, False, False, None, ”, 1, ”, 0, ”, True, False, False) {}
Traceback (most recent call last):
File “/home/DENIRED/stable-diffusion-webui/modules/ui.py”, line 223, in f
res = list(func(*args, **kwargs))
File “/home/DENIRED/stable-diffusion-webui/webui.py”, line 63, in f
res = func(*args, **kwargs)
File “/home/DENIRED/stable-diffusion-webui/modules/txt2img.py”, line 48, in txt2img
processed = process_images(p)
File “/home/DENIRED/stable-diffusion-webui/modules/processing.py”, line 407, in process_images
uc = prompt_parser.get_learned_conditioning(shared.sd_model, len(prompts) * [p.negative_prompt], p.steps)
File “/home/DENIRED/stable-diffusion-webui/modules/prompt_parser.py”, line 138, in get_learned_conditioning
conds = model.get_learned_conditioning(texts)
File “/home/DENIRED/stable-diffusion-webui/repositories/stable-diffusion/ldm/models/diffusion/ddpm.py”, line 558, in get_learned_conditioning
c = self.cond_stage_model(c)
File “/home/DENIRED/stable-diffusion-webui/venv/lib/python3.10/site-packages/torch/nn/modules/module.py”, line 1130, in _call_impl
return forward_call(*input, **kwargs)
File “/home/DENIRED/stable-diffusion-webui/modules/sd_hijack.py”, line 334, in forward
z1 = self.process_tokens(tokens, multipliers)
File “/home/DENIRED/stable-diffusion-webui/modules/sd_hijack.py”, line 349, in process_tokens
outputs = self.wrapped.transformer(input_ids=tokens, output_hidden_states=-opts.CLIP_stop_at_last_layers)
File “/home/DENIRED/stable-diffusion-webui/venv/lib/python3.10/site-packages/torch/nn/modules/module.py”, line 1130, in _call_impl
return forward_call(*input, **kwargs)
File “/home/DENIRED/stable-diffusion-webui/venv/lib/python3.10/site-packages/transformers/models/clip/modeling_clip.py”, line 722, in forward
return self.text_model(
File “/home/DENIRED/stable-diffusion-webui/venv/lib/python3.10/site-packages/torch/nn/modules/module.py”, line 1130, in _call_impl
return forward_call(*input, **kwargs)
File “/home/DENIRED/stable-diffusion-webui/venv/lib/python3.10/site-packages/transformers/models/clip/modeling_clip.py”, line 643, in forward
encoder_outputs = self.encoder(
File “/home/DENIRED/stable-diffusion-webui/venv/lib/python3.10/site-packages/torch/nn/modules/module.py”, line 1130, in _call_impl
return forward_call(*input, **kwargs)
File “/home/DENIRED/stable-diffusion-webui/venv/lib/python3.10/site-packages/transformers/models/clip/modeling_clip.py”, line 574, in forward
layer_outputs = encoder_layer(
File “/home/DENIRED/stable-diffusion-webui/venv/lib/python3.10/site-packages/torch/nn/modules/module.py”, line 1130, in _call_impl
return forward_call(*input, **kwargs)
File “/home/DENIRED/stable-diffusion-webui/venv/lib/python3.10/site-packages/transformers/models/clip/modeling_clip.py”, line 316, in forward
hidden_states = self.layer_norm1(hidden_states)
File “/home/DENIRED/stable-diffusion-webui/venv/lib/python3.10/site-packages/torch/nn/modules/module.py”, line 1130, in _call_impl
return forward_call(*input, **kwargs)
File “/home/DENIRED/stable-diffusion-webui/venv/lib/python3.10/site-packages/torch/nn/modules/normalization.py”, line 189, in forward
return F.layer_norm(
File “/home/DENIRED/stable-diffusion-webui/venv/lib/python3.10/site-packages/torch/nn/functional.py”, line 2503, in layer_norm
return torch.layer_norm(input, normalized_shape, weight, bias, eps, torch.backends.cudnn.enabled)
RuntimeError: “LayerNormKernelImpl” not implemented for ‘Half’
建议尝试加上原 repo wiki 中的 no half 等参数,你的显卡可能没有半精度运算单元。
确实可以啦!!谢谢啊大佬